
Researchers in polymer materials development know that the first step in material performance testing is producing compliant, standardized test specimens.
The traditional approach involves commissioning a factory to create molds and produce samples—a process that can take one to two weeks. If test data proves anomalous, the formulation must be adjusted and the sampling process repeated. A single round of formulation optimization can consume over half a month just waiting for samples, severely hindering R&D progress.
Today, an increasing number of university laboratories and corporate R&D teams are switching to compact desktop injection molding machines to produce standardized specimens in-house. With the ability to prepare materials, mold specimens, and conduct tests all in a single day, formulation iteration efficiency is boosted by an order of magnitude; this eliminates the weeks-long wait associated with factory sampling, enabling rapid iteration on an hourly timescale.
This article outlines the complete practical methodology for producing compliant tensile and impact test specimens using micro-injection molding machines. It covers six key areas—standards and specifications, preparation, operational steps, process parameters, defect troubleshooting, and equipment selection—making it suitable for scientific research, formulation modification, educational demonstrations, and quality control testing.
1. First, let’s clarify: what does a standard spline look like?
Before proceeding, you must first clarify which standard the test specimen you intend to produce must meet. Different standards entail different dimensions and molds, and test data are not interchangeable; therefore, the applicable standard must be confirmed prior to R&D.
- Standard Tensile Specimen (Dumbbell-shaped)
Tensile testing primarily follows two major standards systems: the GB/ISO standards and the ASTM standards. The three specifications most commonly used in R&D are as follows:

- Standard Impact Test Specimens
Plastic impact testing is categorized into Charpy and Izod methods; different standards are suited to different applications. Common specifications are as follows:
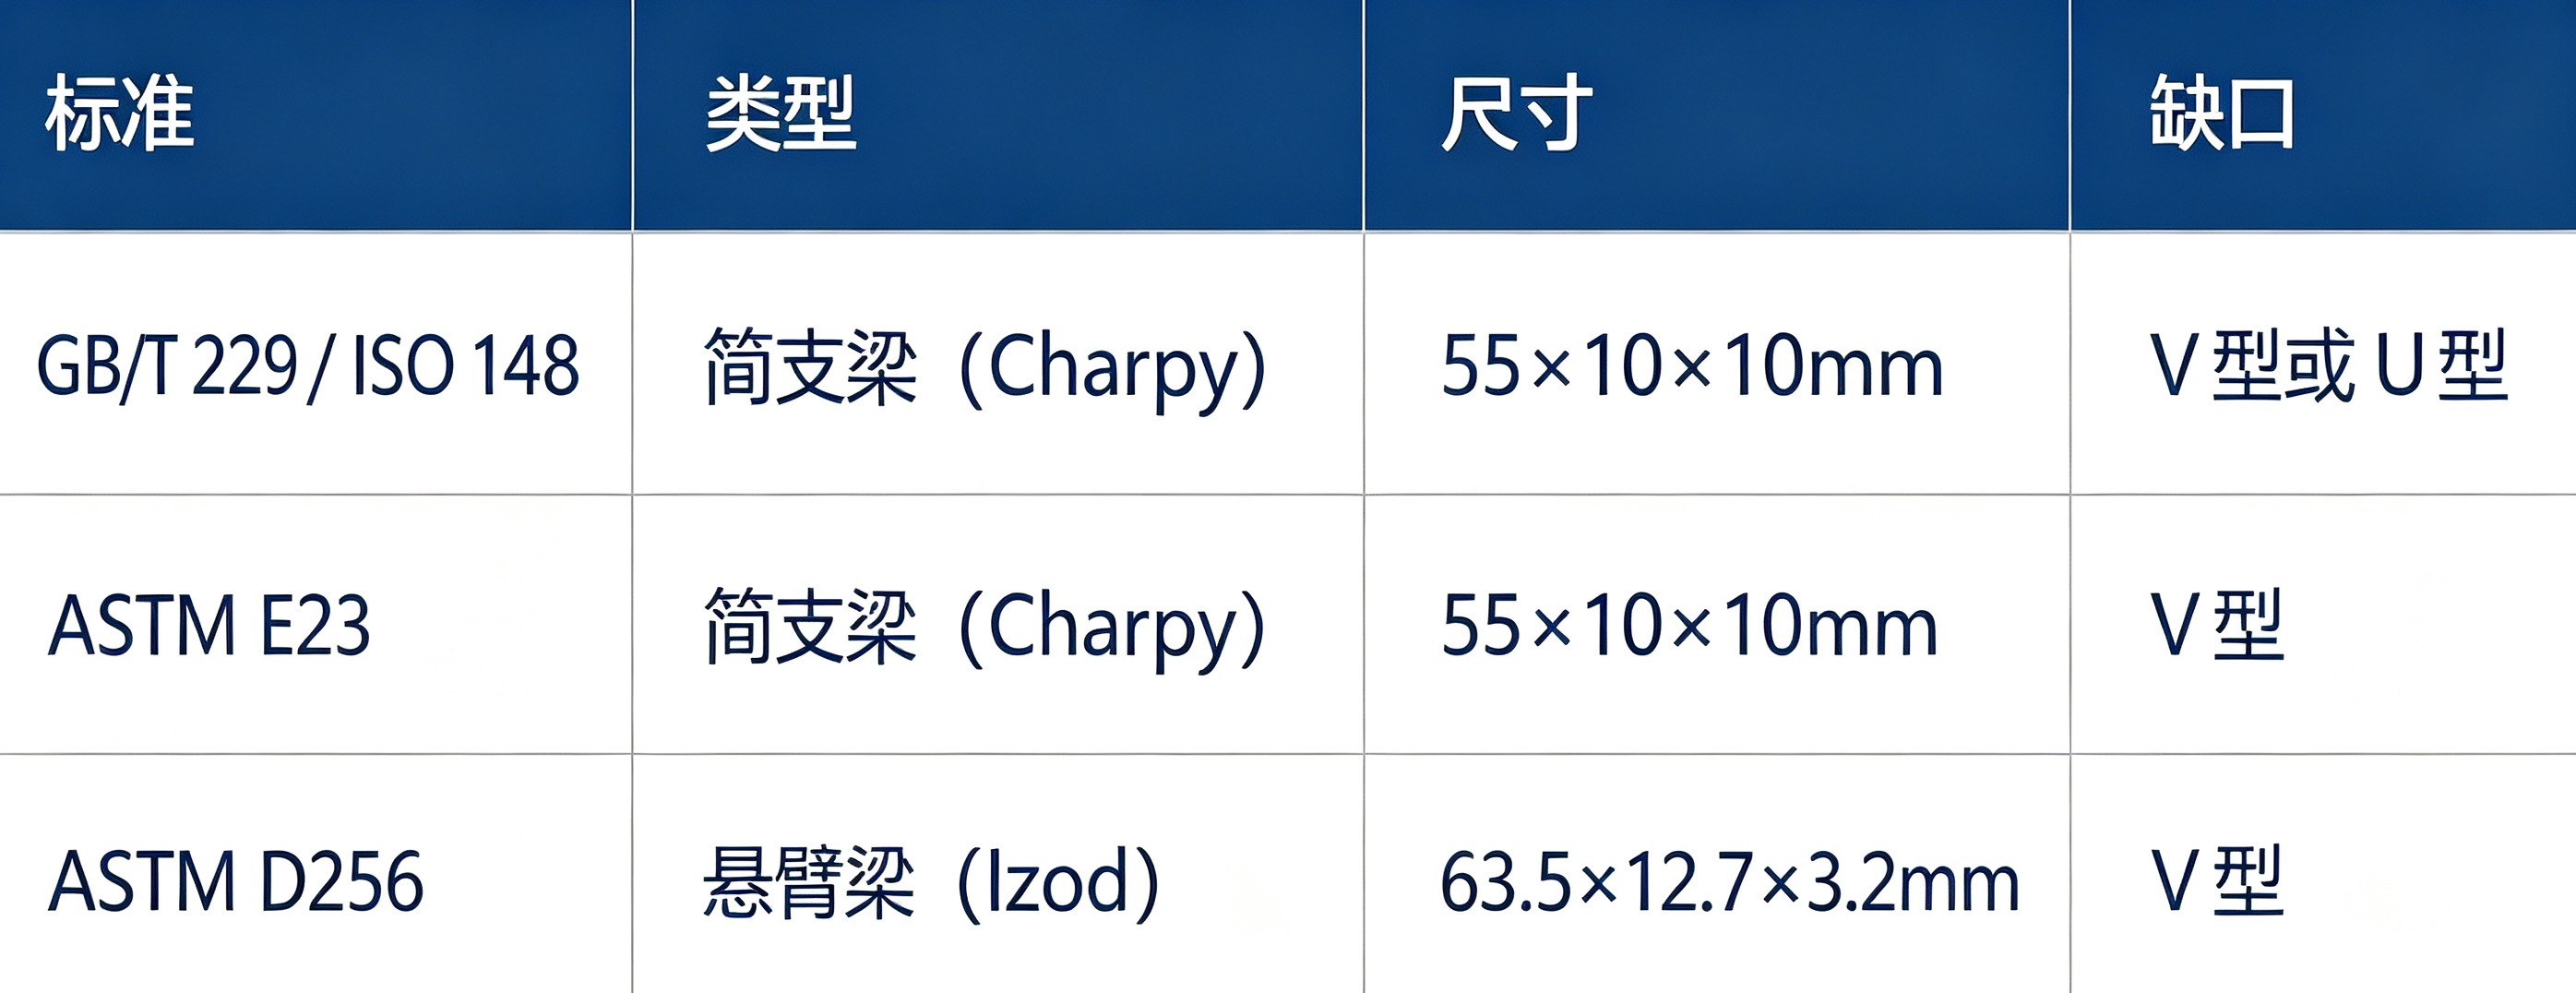
II. Why use a micro-injection molding machine to produce test specimens?
Compared to the traditional practice of outsourcing mold making and prototyping to external factories, desktop micro-injection molding machines offer a distinct advantage in R&D. A single prototyping run requires only tens of grams of raw material and eliminates the need to wait for mold fabrication; the entire process—from material preparation and injection molding to sample creation and comprehensive testing—can be completed in a single day.

III. Preparations Prior to Sample Preparation
1. Equipment Preparation
- Check that the micro-injection molding machine is operating correctly and that the heating zones are functioning properly;
- Clean the barrel and screw to prevent residual material from the previous run from contaminating the test specimens;
- Ensure the mold is securely installed and precisely positioned;
- Check the nozzle for obstructions and clear any blockages promptly.
2. Material Preparation
- Drying: Hygroscopic polymer materials (such as PA, PC, PET, PBT) must undergo strict, constant-temperature drying prior to molding to completely remove internal moisture; this prevents defects such as bubbles, silver streaks, and voids, and ensures the accuracy of mechanical test data;
- Coloring/Blending: If adding masterbatches or functional additives, or performing polymer blend modification, mix the materials thoroughly beforehand using a micro-compounder or internal mixer;
- Weighing: As micro-injection molding machines require small amounts of material, precise weighing is recommended to avoid waste.
3. Mold Preparation
- Verify mold cavity dimensions to ensure compliance with target testing standards;
- Thoroughly clean mold surfaces to remove contaminants such as oil, grease, and anti-rust agents;
- Ensure precise positioning and secure clamping during mold installation to prevent issues such as flash or dimensional deviations during the molding process.
IV. Detailed Operational Steps
Step 1: Set the temperature.
Set the temperature for each zone based on the material properties. Taking common materials as examples:

The Tianshiwei M08/M15 micro-injection molding machines reach temperatures of up to 450°C, accommodating high-temperature engineering plastics such as PEEK and PPS; the M05 model reaches up to 350°C, making it suitable for general-purpose and standard engineering plastics.
Step 2: Feeding and Plasticization
- Once the set temperature is reached, maintain the temperature for 10–15 minutes to ensure uniformity across the barrel and eliminate temperature gradients;
- Add the dried material and begin screw plasticization;
- Monitor the state of the melt throughout the process to ensure uniform plasticization and the absence of unmelted particles.
Step 3: Parameter Settings
- Injection pressure: Set based on material viscosity and specimen dimensions; typically 60–100 MPa for general-purpose and engineering plastics, while high-viscosity or glass-fiber reinforced materials may require an increase to 120–150 MPa.
- Injection speed: Prioritize low-to-medium speeds for mold filling to avoid air entrapment, material scorching, and excessive internal stress caused by high-speed injection.
- Holding pressure: Typically 50%–80% of the injection pressure; use the upper limit for high-shrinkage materials (such as PP and PE) and thick-walled specimens.
- Holding time: Set based on specimen thickness; typically 5–15 seconds for standard specimens.
- Cooling time: Set based on material and mold temperatures; typically ranges from 10 to 30 seconds to ensure the specimen sets properly without deformation.
Step 4: Test Firing and Adjustment
- First, run 2–3 molding cycles to “purge” the machine and ensure the material inside the barrel is uniform;
- Begin actual sampling and observe the appearance of the test specimens;
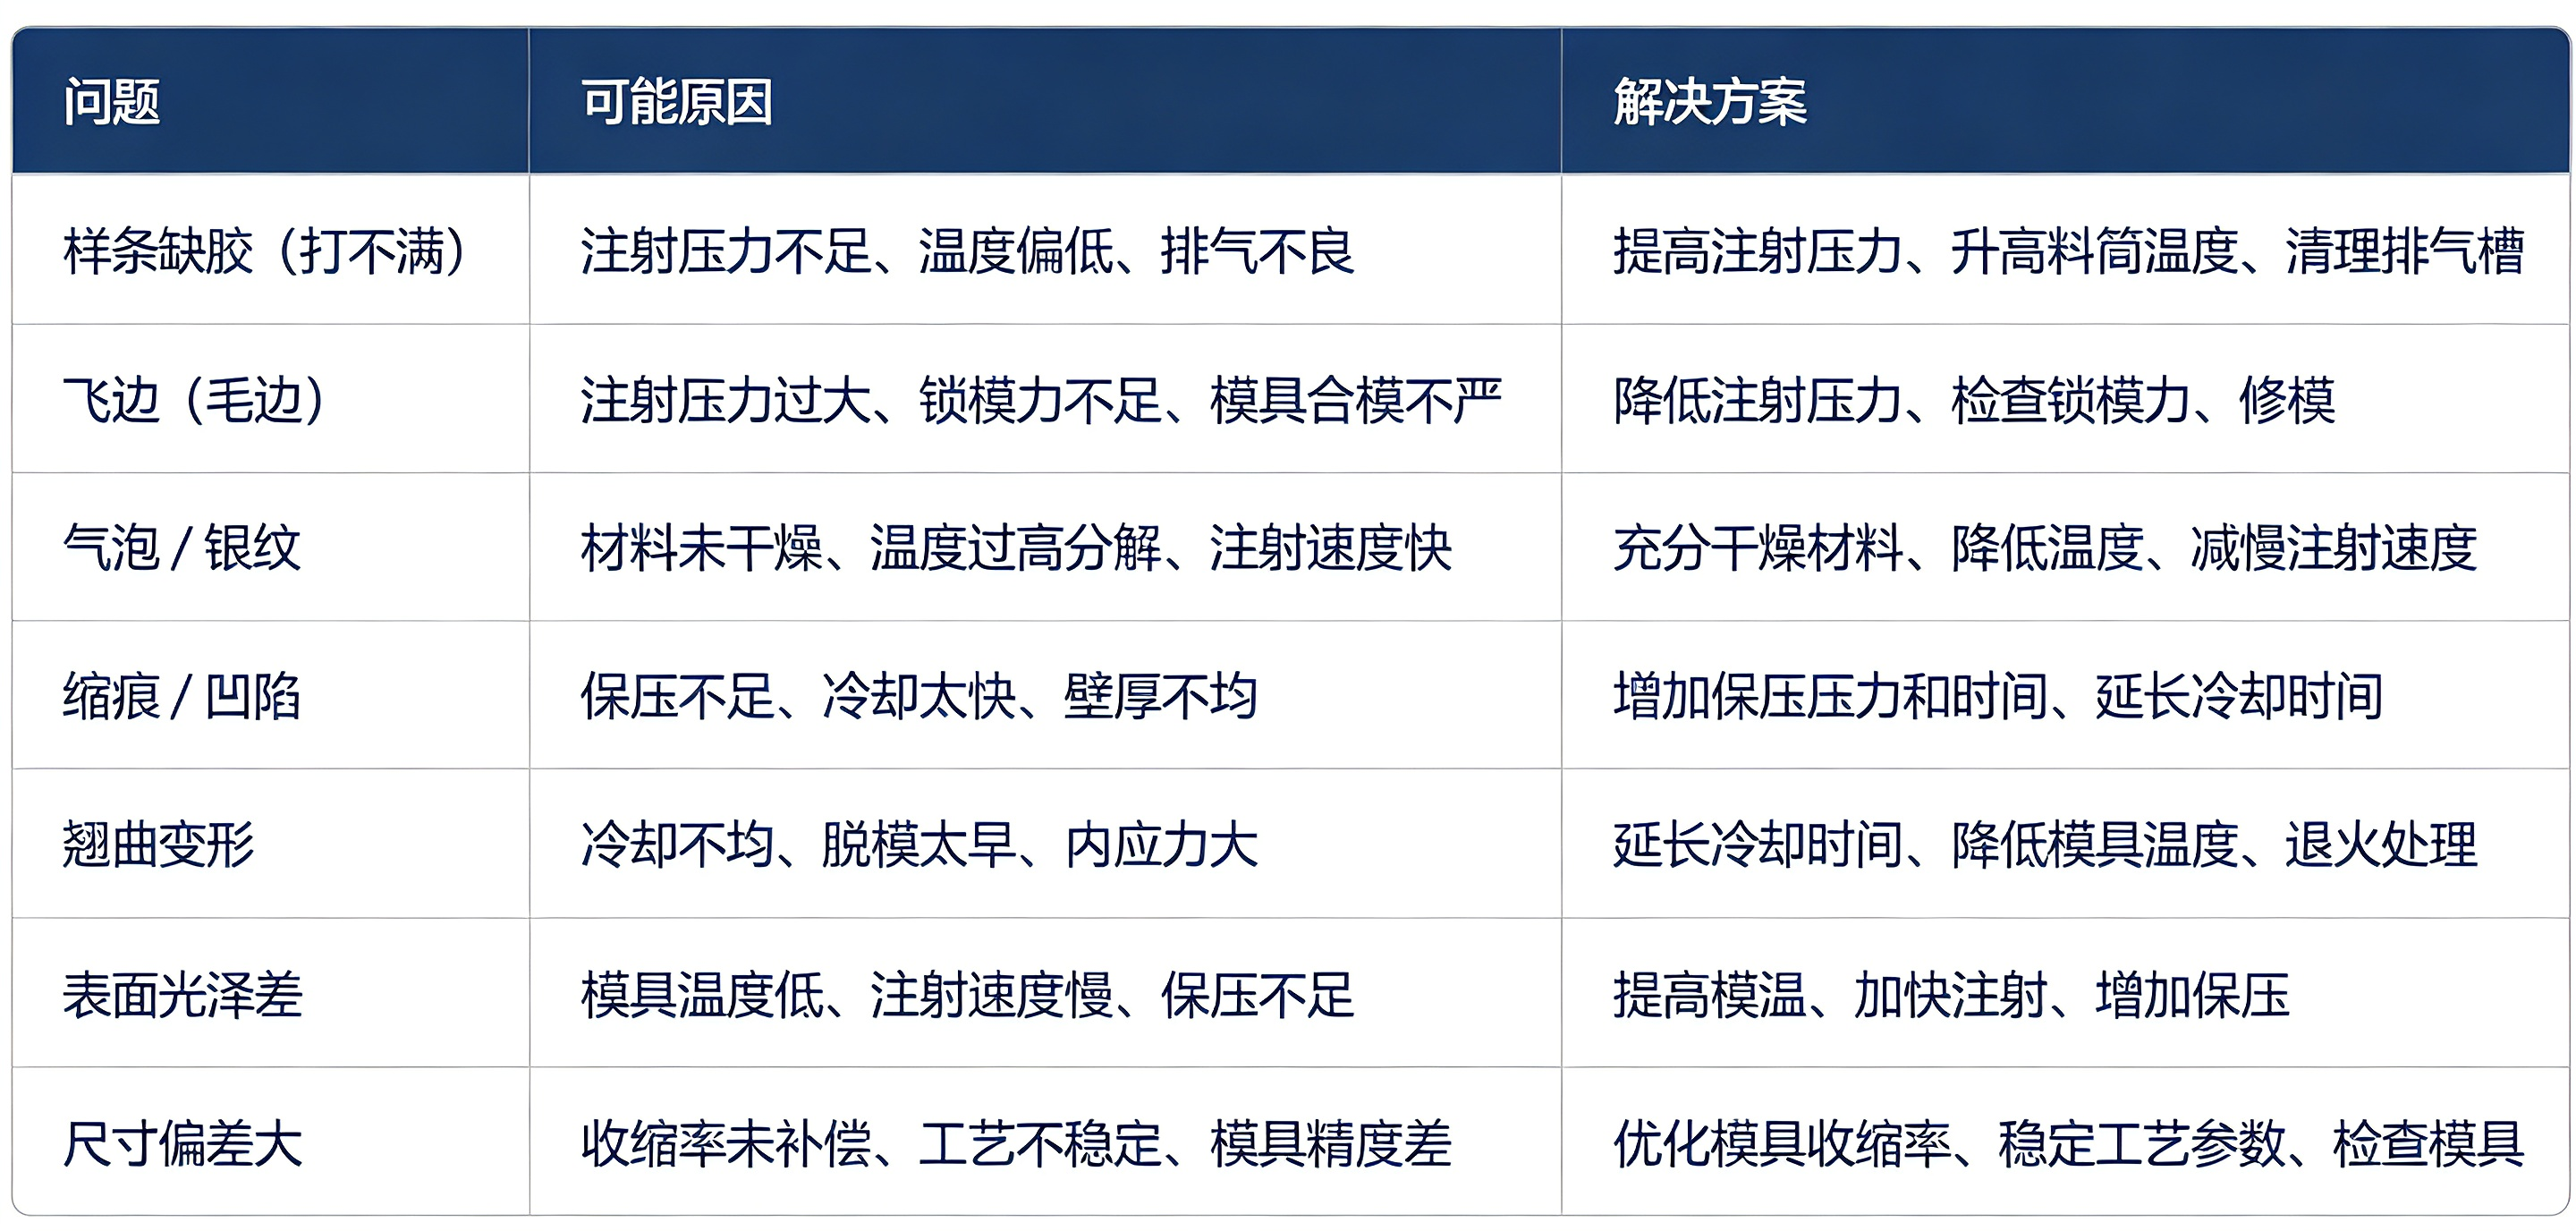
- Adjust processing parameters accordingly if issues such as short shots, flash, air bubbles, or sink marks occur.
Step 5: Batch Sample Preparation
- Once the process is stabilized, produce samples continuously;
- Prepare at least five test specimens for each formulation to calculate the mean and standard deviation;
- After removal, place the specimens on a flat surface to cool naturally and prevent deformation;
- Label the material formulation.
Step 6: Conditioning
- After the specimens are prepared, perform conditioning in accordance with standard requirements;
- Typically, this involves storage at 23°C and 50% relative humidity for at least 24 hours;
- For hygroscopic materials such as PA, drying or moisture conditioning must be performed according to the standards;
- Conduct testing as soon as possible after conditioning is complete.
V. Common Defects and Corresponding Solutions
During the micro-injection molding of test specimens, visual defects and dimensional deviations are the most common issues, typically stemming from improper process parameters or inadequate material handling. A summary of the causes and practical solutions for these problems is provided below:
VI. Selection Recommendations for Tianshiwei Micro Injection Molding Machines
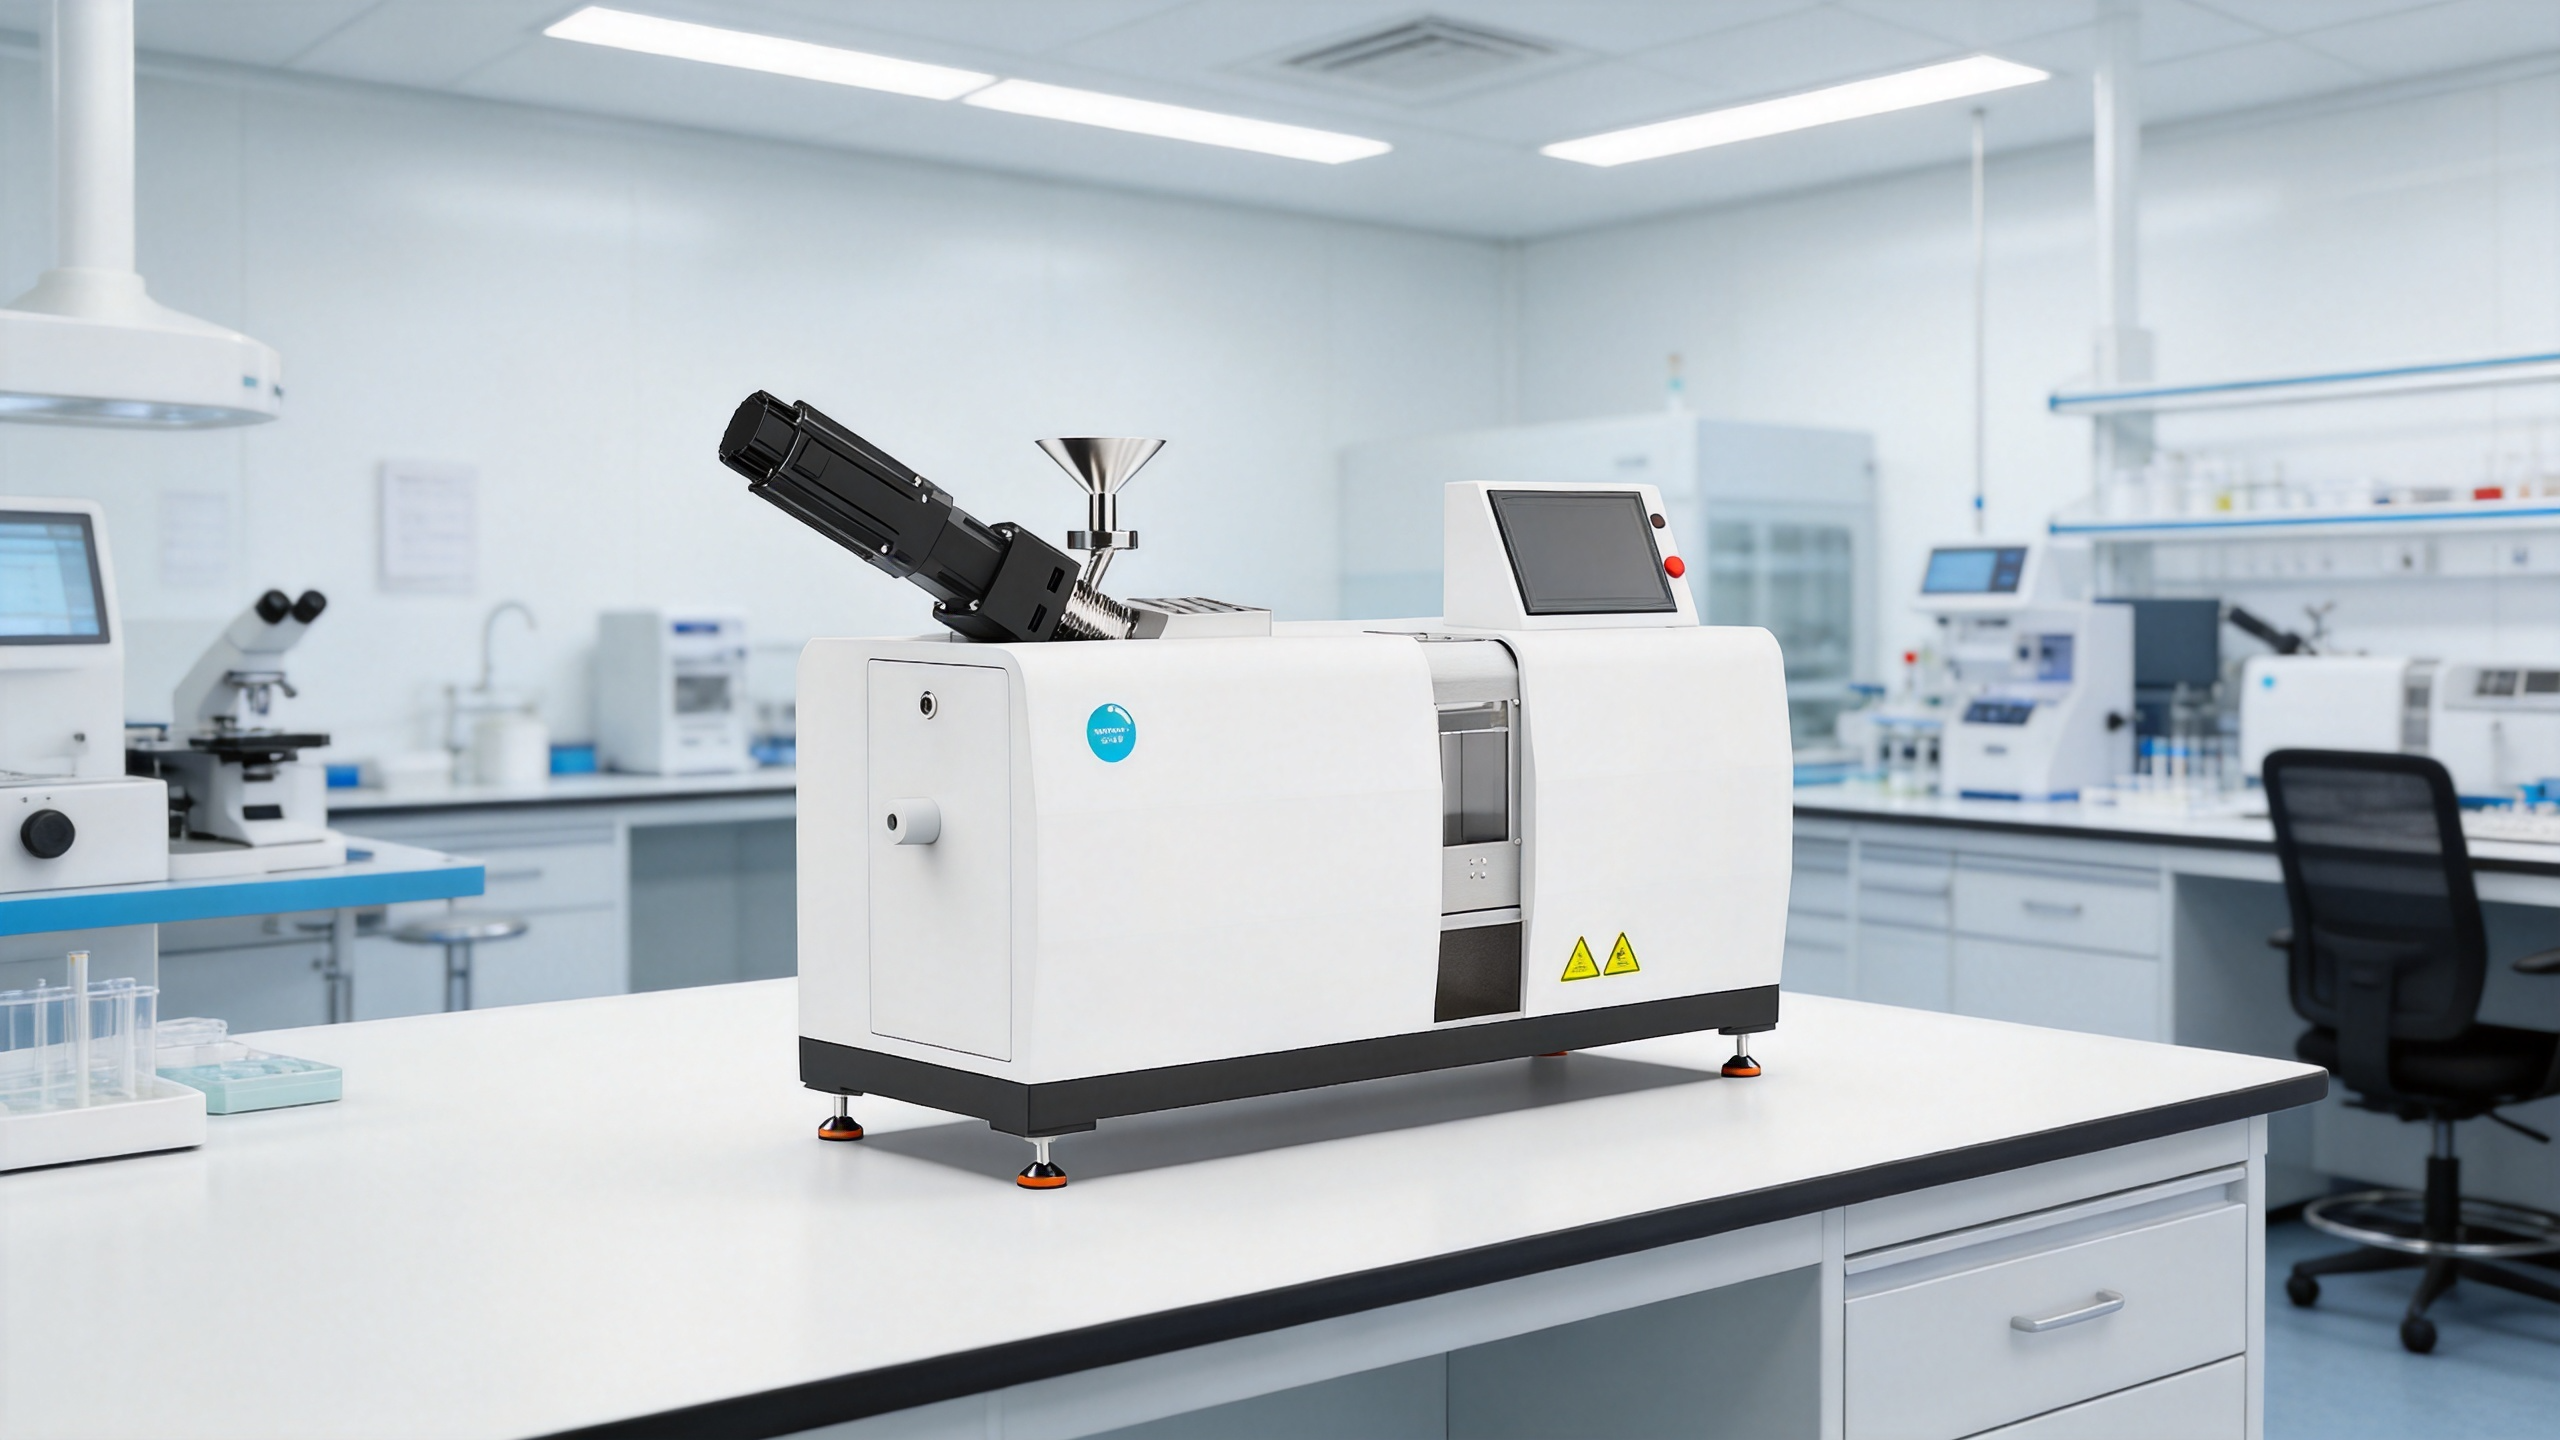
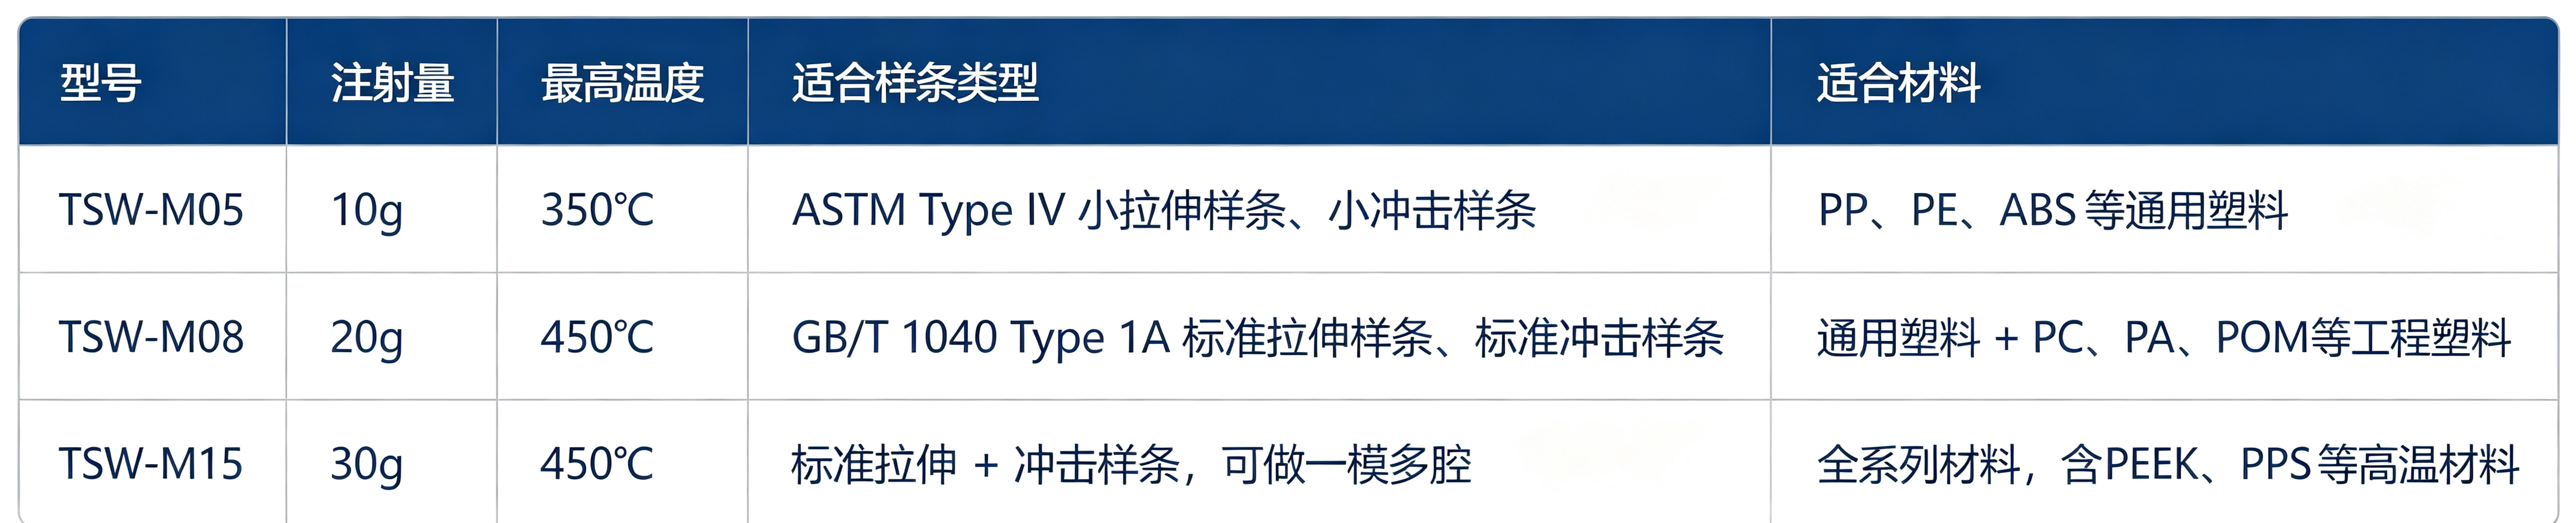
- University Teaching & Basic R&D: The M05 model is sufficient; it offers low costs, a compact footprint, and ease of operation, making it ideal for preparing general-purpose plastic test specimens.
- Materials R&D Laboratories: The M08 model features a 20g injection capacity—perfect for producing various standard tensile and impact specimens—and a 450°C temperature range capable of processing the vast majority of engineering plastics, supporting routine formulation iteration and modification research.
- High-End Materials & Pre-Production Validation: The M15 model offers a 30g injection capacity that supports two-cavity mold setups for higher sample preparation efficiency, while its 15-ton clamping force ensures greater stability.
VII. Frequently Asked Questions (FAQ)
Q: Do the test data for specimens produced by micro-injection molding machines match those from large-scale machines?
A: Provided that process parameters are set reasonably, mold precision meets standards, and specimen conditioning follows proper protocols, the consistency of test data is extremely high. Existing industry research indicates that the mechanical property data of standard specimens produced by precision micro-injection molding machines deviate by less than 5% from those produced by large industrial machines, fully meeting the requirements for university research, corporate R&D, and quality control testing.
Q: Are the notches in the specimens formed during injection molding or created via post-processing?
A: Both methods are viable, depending on the specific R&D scenario. Molding the notch directly offers high efficiency and eliminates the need for secondary processing, making it suitable for the rapid screening of large numbers of formulations in the early stages; however, factors such as molding shrinkage and internal filling stresses can result in poorer dimensional accuracy and inconsistent notch radii. For high-precision research, academic publication, third-party quality inspection, or arbitration testing, we recommend using a dedicated notch-cutting machine for post-processing. This allows for the precise creation of standard V-shaped or U-shaped notches with minimal dimensional error, no additional internal stress, and optimal data repeatability.
Q: Must the barrel be cleaned every time the material is changed?
A: Yes. When switching between materials of different systems, colors, or compositions, the barrel and screw must be thoroughly cleaned to prevent material contamination or performance deviations caused by trace residues. You can use specialized screw-cleaning compounds or perform continuous purging with the next material until the specimen’s appearance and performance stabilize completely. When switching from dark-colored materials to light-colored or transparent ones, the cleaning process should be extended to ensure no residue remains.
Q: Does the presence of air bubbles in the molded specimens indicate a machine malfunction?
A: In the vast majority of cases, this is not an equipment failure but rather an issue with the material or the process parameters. The three primary causes of air bubbles are: first, insufficient drying of hygroscopic materials (such as PA, PC, or PET), causing moisture to vaporize at high temperatures; second, excessive barrel temperature, leading to thermal decomposition and gas generation; and third, excessive injection speed, causing air entrapment during mold filling. Prioritizing checks on material drying, process temperatures, and injection speeds can resolve over 90% of air bubble issues. For the R&D of polymer materials, a micro-injection molding machine offers value that extends far beyond merely saving on prototyping costs or reducing material waste. Its most critical advantage lies in fundamentally reshaping the R&D workflow: it breaks free from the scheduling constraints of external contract manufacturing, transforming traditional formulation iteration cycles—which typically span days or weeks—into autonomous, controllable processes measured in hours. By drastically shortening development cycles and enhancing both the efficiency of formulation tuning and data reliability, it serves as an essential tool for academic research and corporate R&D in new material modification.
If you are considering acquiring a laboratory-grade micro-injection molding machine, please contact us via email to receive a complimentary specimen preparation plan and equipment selection advice.